IRIS Custom Report FAQs
Contents
- 1 How do I share a report?
- 2 What is the meaning of the various filter “operators”?
- 3 Does the Calendar Between Control include records on the start and end dates?
- 4 How can I “page” through the report results that are displayed in my web browser?
- 5 How do I show the report filters in printed and exported reports?
- 6 Why aren’t my calculated fields working properly when I divide a count of cases by the sum of case size and the result is always zero>
- 7 Why is my report giving an error when it includes a field of data type “Text”?
- 8 When I download a report as an Excel file, why do I get a strange warning message?
- 9 Can I change chart colors?
- 10 Is there a list of colors so I can see what the color names look like?
- 11 How do I link a field to a web page / URL?
- 12 What is the difference between the IRIS Custom Report groups?
- 13 How do I run a custom report that pulls from several tables but does not exclude records that may have no value in one table?
- 14 How do I schedule a report to be automatically emailed?
1. How do I share a report?
Open the report in the report designer tool and then go to the MISC tab to change the sharing options.
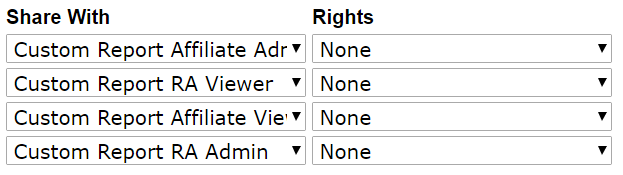
The Share With dropdown allows you to share your report with IRIS uses in the following IRIS Custom Report groups:
- Custom Report RA Admin
- Custom Report RA Viewer
- Custom Report Affiliate Admin
- Custom Report Afffiliate Viewer
The Rights dropdown allows you to give the users you are choosing to share the report with different levels of access. The levels of access you can grant are as follows:
- ... - No rights are applied to this report.
- None - The report is unavailable to (hidden from) the users.
- Full access - The report is available for users to view, modify, and save changes to.
- Read only - The report is available for users to view, add or remove filters, and modify the existing filters' values. Users may also modify(design) the report but cannot overwrite the existing report. They may, however, save it as a new report.
- View only - The report is available to the user to view, but not to modify in any way or save changes to.
- Locked - The report is available to users to view, and users can modify existing filters' values, but users cannot add or remove filters or fields, and they cannot save changes to the report. Users may also not change the column or operator of the filters.
2. What is the meaning of the various filter “operators”?
Operator Categories
| Type | Filter | Description |
|---|---|---|
| Comparison | Is Less Than | Displays only items whose values are less than the input values. |
| Comparison | Is Greater Than | Displays only items whose values are greater than the input values. |
| Comparison | Between | Displays only items whose values lie between the input values. |
| Comparison | Isn't Less Than | Displays only items whose values are not less than the input value. |
| Comparison | Isn't Greater Than | Displays only items whose values are not greater than the input value. |
| Comparison | Isn't Between | Displays only items whose values are between the input values. |
| Equivalence | Equals | Manual text entry of the comparison value(s) separated with commas for easy copy/paste from CSV. |
| Equivalence | Equals(List) | Manual text entry of the comparison value(s) separated by intelligently parsed delimiters. User delimiter use must be consistent. For example of consistent use: 1, 2, 3, 4 or 1-2-3-4 or 1 2 3 4 |
| Equivalence | Equals(Autocomplete) | Manual text entry of the comparison value(s) that displays a list of options as you type. Separate each value with a comma. |
| Equivalence | Equals(Select) | Allows you to select a single value from a dropdown list. |
| Equivalence | Equals(Multiple) | Allows you to select multiple values from a scrollable list. Use ctrl+click to highlight multiple values (command+click on Mac). |
| Equivalence | Equals(Popup) | Allows selection of multiple values from a popup list of checkboxes. |
| Equivalence | Doesn't Equal | Exactly the opposite of equals. |
| Equivalence | Doesn't Equal (Select) | The opposite of Equals (Select). |
| Equivalence | Doesn't Equal (Multiple) | The opposite of Equals (Multiple). |
| Equivalence | Doesn't Equal (Popup) | The opposite of Equals (Popup). |
| Field Comparison | Is Less Than (Field) | Allows you to compare one field to another. Determines if the first field is less than the second field. |
| Field Comparison | Is Greater Than (Field) | Allows you to see if one field is greater than another field. |
| Field Comparison | Equals (Field) | Determines if one field value equals another. This is useful for joining tables on multiple fields. |
| Field Comparison | Not Equals (Field) | The opposite of Equals(Field). |
| Date/Time | Between (Calendar) | Allows you to select two dates from a calendar popup to filter on. This filter is inclusive - any dates equal to or between the specified values will be included. |
| Date/Time | In Time Period | Allows you to select from a list of time periods to filter on. |
| Date/Time | Less Than Days Old | Allows a single numeric entry to represent the days and uses that as a filter. |
| Date/Time | Greater Than Days Old | The opposite of Less Than Days Old |
| Date/Time | Equals Days Old | Filters on records that are only as many days old as you specify. |
| String | Like | Determines if the value of the field contains the given text. |
| String | Begins With | Determines if the value of the field begins with the given text. |
| String | Ends With | Determines if the value of the field ends with the given text. |
| String | Isn't Like | The opposite of Like. |
3. Does the Calendar Between Control include records on the start and end dates?
There is a type of report filter that only applies to dates that lets you choose a start and end date for a filter.

Figure. In report design mode, this is an example of a filter that uses a "Between" control to select start and end dates for a report.
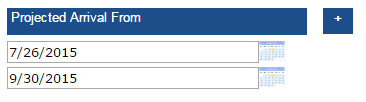
Figure. This is how the filter looks when running the report.
The “Between(Calendar)” is inclusive. It looks at the date portion of a datetime field. So any date which is equal to or within the specified values will be included.
4. How can I “page” through the report results that are displayed in my web browser?
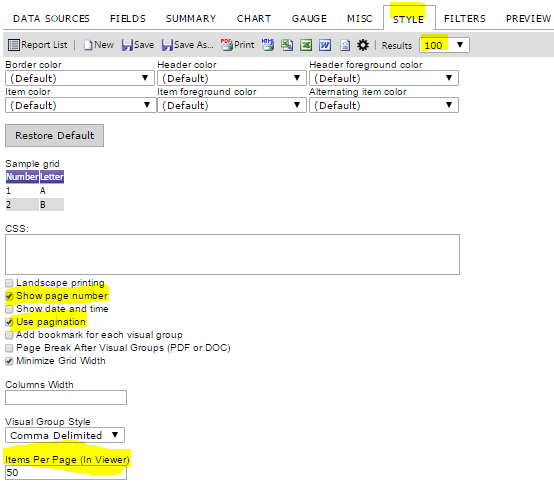
- To allow paging or “pagination”, click on the “STYLE” tab.
- Check the box for “Show page number” and “Use pagination”
- Also, for “Items Per Page (In Viewer) choose a value greater than 0
- Change the Results dropdown to a value greater than the value in the “Items Per Page (In Viewer)”. In this example, the Results value needs to be greater than 50. The number of results may be changed in design view or when the report is run in.
5. How do I show the report filters in printed and exported reports?
- From the FILTERS tab click the check box for “Show Filters in Report Description”
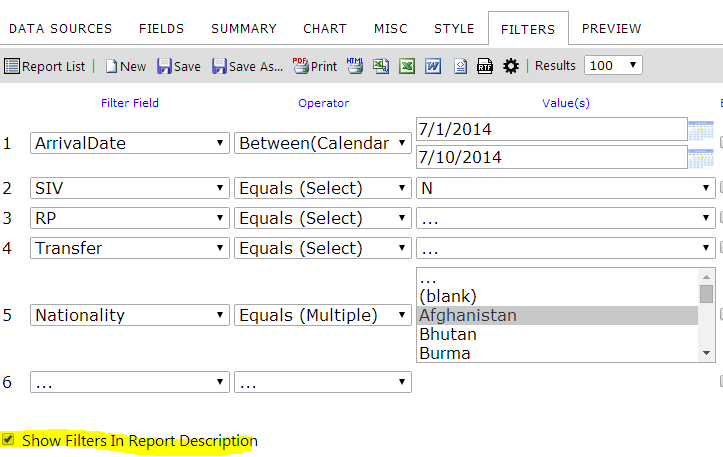
Figure 3 Checkbox on the Custom Report Filters tab making the filters appear in printed or saved reports.
- The filters put on the report will now be displayed when the report is run.
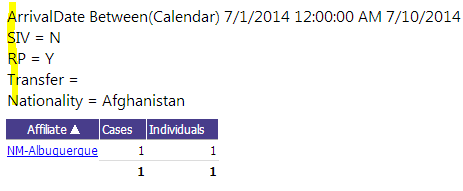
Figure 4 Example of how the filters display in a printed or exported report.
6. Why aren’t my calculated fields working properly when I divide a count of cases by the sum of case size and the result is always zero.
There are two possible solutions:
- Change the Format and you'll see fractional part.
- If both operands are integer then result would be integer too. In this case you could use a trick to convert integer to float: COUNT([IRIS_CASE].[CaseNumber]) / Sum([IRIS_CASE].[CaseSize] * 1.0). Multiplying an integer by 1.0 changes it to a real number.
7. Why is my report giving an error when it includes a field of data type “Text”?
If a field is of the SQL TEXT data type, you should not check the “Distinct” checkbox on the Data Sources tab.
8. When I download a report as an Excel file, why do I get a strange warning message?
It is because the file is not a native MS Excel file. It is a plain text file with information which Excel can read and convert, but Excel will display a warning before opening.
9. Can I change chart colors?
No, unfortunately, that is not possible
10. Is there a list of colors so I can see what the color names look like?
No, however, Izenda uses standard HTML color names. Here is a link to a good reference for all 140 colors - http://www.w3schools.com/html/html_colornames.asp
11. How do I link a field to a web page / URL?
- Field indexes start at number one (1). I.e. 1st field is {1}, 2nd field is {2}, etc.
- Additionally you can use {0} to specify 'this' value, i.e. 0 is a reserved index for 'this'. You can still use actual index if needed. “This” refers to the field currently being edited.
- Example:Page.aspx?id={0}&value={1}
- The report “Case Detail” has an example of how to link from the report to a case in IRIS.
12. What is the difference between the IRIS Custom Report groups?
- Custom Report RA Admin: RA users with in this role may view reports and create reports
- Custom Report RA Viewer: RA users with in this role may only view reports
- Custom Report Affiliate Admin: Affiliate users with in this role may view reports and create reports
- Custom Report Affiliate Viewer: Affiliate users with in this role may only view reports
13. How do I run a custom report that pulls from several tables but does not exclude records that may have no value in one table?
For instance, if we run a report using the IRISCASE and MGCASE tables, IRIS automatically filters out records that have no data in the MGCASE table (because have no MG program). However, we want to include those sites since we are looking at a number of different data points.
From the data sources tab, choose the tables and then check "allow nulls". By checking the 'Allow nulls' checkbox, you tell the system to use an OUTER JOIN as its join type.
14. How do I schedule a report to be automatically emailed?
From the MISC tab, a custom reports may be set-up to send a report by email on a recurring schedule.
| Control | Description |
|---|---|
| Schedule | Set the schedule date and time. |
| Repeat Type | Set the repeat frequency from a list of possibilities. |
| Send Email As | The only option is Link. When the report is emailed, the email message will contain a link to open the report in IRIS. Using a link prevents sensitive information from being emailed in an unsecure manner. |
| Recipients | Enter a comma separated list of recipients. |
There are two types of time period in the Repeat Type: Every TimePeriod and Alert TimePeriod.
- Every will run the report every specified time period, and produce an export even if there are no results to display. This means that you may get a scheduled report email with no results, if there are no results to be displayed.
- Alert will run the report but only email output to specified recipients if there are results - a report which returns 0 records will not send anything to recipients.